
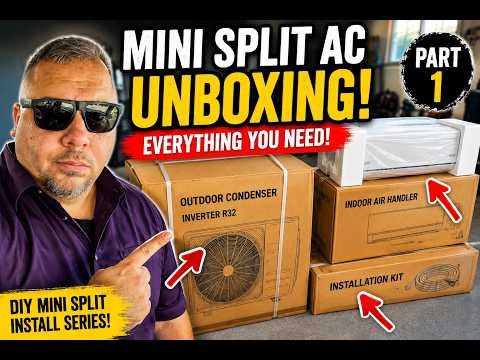
In Part 1 of this mini-split series, Handyman Problem Fixer unboxes an 18,000 BTU Wi-Fi mini-split system and lays out the components and accessories for the project. This companion checklist summarizes the equipment discussed in the original video and highlights important safety and compatibility considerations.
Watch the Original Video

Open this video on YouTube. This is a companion guide based on the video’s description with additional general information rather than a verbatim transcript.
What arrives with a mini-split system
The video description says the unboxing covers an indoor air handler, outdoor condenser, refrigerant line set, electrical disconnect, line-hide kit, and various installation supplies. Verify delivered contents against the exact model’s packing list before discarding boxes or beginning work. Keep the equipment model and serial numbers for warranty service.
Check sizing and location before mounting
Cooling capacity, line lengths, mounting clearance, drainage, electrical supply, and the room’s heat load must match the selected unit. An 18,000 BTU label alone does not prove suitability for every space. Consider condensate routing, noise, accessible service space, and local permits before finalizing locations.
Electrical and refrigerant work need special care
A mini-split combines high-voltage wiring, condensate management, pressurized refrigerant, and manufacturer-specific procedures. Local rules may require licensed professionals and permits. Refrigerant handling and release are federally regulated; don’t vent refrigerant or treat professional evacuation, pressure-testing, or charging instructions as interchangeable between models. Have qualified personnel handle work for which licensing or specialized equipment is required.
Keep products and tool choices separate
Some links below are for installation materials and some are for test equipment or tools. Not every item is needed for every model. Follow the manufacturer-specified wire type, breaker size, disconnect rating, flare torque, vacuum requirements, and refrigerant instructions rather than copying a different setup.
What to document during the project
Photograph the unit nameplates, installed brackets, condensate slope, electrical labels, line-routing details, and commissioning results. This helps future troubleshooting and may be useful for service and warranty purposes. The unboxing video is a starting point, not a completed installation or final performance test.
Product links from the original video
Affiliate disclosure: As an Amazon Associate, I earn from qualifying purchases. These links were shared with the original demonstration; product selections and listings may have changed. Check compatibility, current specifications, and relevant safety instructions.
- Original mini-split video equipment link 1
- Original mini-split video equipment link 2
- Original mini-split video equipment link 3
- Original mini-split video equipment link 4
- Original mini-split video equipment link 5
- Original mini-split video equipment link 6
- Original mini-split video equipment link 7
- Original mini-split video equipment link 8
- Original mini-split video equipment link 9
- Original mini-split video equipment link 10
- Original mini-split video equipment link 11
- Original mini-split video equipment link 12
- Original mini-split video equipment link 13
- Original mini-split video equipment link 14
- Original mini-split video equipment link 15
- Original mini-split video equipment link 16
For more how-to videos, visit the Handyman Problem Fixer video library.

0 Comments