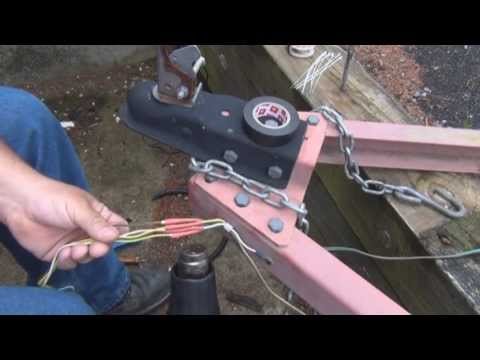
The creator’s video shows replacing and extending a four-pin trailer connector after a customer’s cable was repeatedly pulled loose during turns. The inspection also found deteriorated wires and connector components. This written guide explains why harness routing matters as much as the connector itself.
Watch the Original Handyman Problem Fixer Video

Watch on YouTube. This is a written companion guide using the original video’s description and general maintenance information, not a transcript.
Understand the cause of repeated damage
A harness that becomes taut during sharp turns can rip out its plug, pull on terminals, or tear insulation. A replacement connector without adequate slack and strain relief will likely fail again. Check the trailer tongue geometry and the tow vehicle’s normal turning range.
Confirm wiring functions
A conventional flat four-way connector often carries ground, tail/running lights, and left/right combined stop/turn signals. Wire colors are conventions, not proof of function; verify the trailer and tow vehicle using reliable diagrams and an appropriate test method.
Use weather-resistant connections
Choose a harness and connector with correct conductor gauge and enough length for proper routing. Use automotive-grade sealed splices or appropriately installed solder/heat-shrink products, as permitted by the repair method. Protect the harness from exhaust heat, abrasion, sharp edges, and moving couplers.
Test at full articulation
Before road use, check running, brake, and turn signals, then verify the cable has sufficient slack through the trailer’s realistic turning positions without dragging on the road or contacting the hitch. Also check the safety chains, breakaway system if equipped, and hitch connections.
Relevant Amazon Tools and Accessories
Affiliate disclosure: As an Amazon Associate I earn from qualifying purchases. These are affiliate links; Handyman Problem Fixer may earn a commission from qualifying purchases at no additional cost to you. These links open Amazon search results rather than specific product listings, so verify model compatibility and current availability.
Product search categories verified from affiliate link destinations. The heat-shrink link was supplied separately.
- Four-pin trailer wiring harnesses — Amazon search
- Heat-shrink electrical wire connectors — Amazon Associates search
- Four-pin trailer wiring testers — Amazon search
See additional repair videos and written DIY guides.

0 Comments