

Handyman Problem Fixer: A toilet that keeps running may be quietly wasting water even when the floor is dry. This step-by-step troubleshooting guide shows homeowners how to test for a leaking flapper, recognize a fill-valve problem, adjust the chain and decide when the safest fix is to call a plumber. It applies to typical gravity-flush toilets and avoids guessing which replacement part you need.
Why a running toilet is worth investigating
A toilet that refills for a few seconds every so often can be easy to ignore. The sound stops, nobody sees a puddle, and the fixture continues flushing. But a tank that repeatedly loses water into the bowl may be wasting water around the clock. The good news is that many common causes can be narrowed down without removing the toilet or opening a wall. This guide focuses on ordinary gravity-flush tank toilets, not pressure-assisted or commercial flushometer models. The first goal is diagnosis, not buying parts. Identify what the water is actually doing before deciding which repair makes sense.
Understand the basic tank components
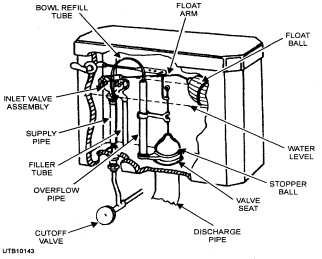
Most conventional toilets have a fill valve connected to the water supply, a float mechanism that signals when to stop filling, a flush lever and chain or lift assembly, and a flapper or other flush-valve seal at the bottom of the tank. Water normally enters the tank after a flush, stops near the prescribed level, and stays there. When the handle is pressed, the flush seal opens and the stored water moves into the bowl. A small refill tube also helps restore water in the bowl. Knowing these roles makes diagnosis less mysterious and helps keep an inexpensive flapper problem from being confused with a fill-valve issue.
Start with a quiet visual inspection
Remove the tank lid carefully and set it on a stable, padded surface; porcelain lids can break and damage flooring. Watch one complete flush with the tank exposed. Does the flapper lift and fall freely? Does the chain become trapped underneath? Does the fill valve shut off after the tank reaches its normal level? Is water running down the overflow tube? Do you see a crack, corroded fastener or damp supply connection? Avoid immediately turning adjustment screws or changing several parts at once. A single observation made before disturbing anything may tell you more than a half-hour of random adjustments.
Use the dye test to catch a silent leak
The EPA recommends placing a little food coloring or a dye tablet in the tank, waiting about ten minutes without flushing, and checking whether color appears in the bowl. If it does, tank water is escaping through the flush-valve area even though the toilet has not been operated. Flush promptly after the test so the dye does not stain the porcelain. Do not put cleaning chemicals in the tank while conducting this check. The test works because it isolates a slow leak that may not make obvious noise. It is a useful first step before spending money on a replacement fill valve.
If colored water reaches the bowl
A positive dye test usually directs attention to the flapper or flush-valve seal. Old rubber can harden, warp or collect deposits, preventing a complete seal. A chain that is too short or caught under the flapper may hold it slightly open. Shut off the supply before working in the tank and inspect the seating surface with a flashlight. If the chain is tangled, correct its routing and test again. If the seal looks visibly deteriorated, replacement may be appropriate. Persistent leaking despite a new, compatible seal can indicate damage or deposits on the flush-valve seat, which deserves further evaluation.
If water flows into the overflow tube
A different situation occurs when the tank fills too high and sends water down the overflow tube. The fill valve may not be shutting off, or the float may be positioned too high or binding. Compare the water level with the manufacturer’s mark on the tank or valve. Many toilets are designed to stop with the water level below the top of the overflow tube. Adjust only according to the specific valve instructions. If the mechanism continues running despite an appropriate float setting, the fill valve itself may need replacement. Do not cap the overflow tube or deliberately bypass this safety feature to stop the sound.
What a phantom flush really means
Sometimes a toilet seems to flush itself even though nobody touched the handle. The tank may quietly lose enough water through a worn seal that the float drops and triggers the fill valve to restore the level. That refill noise can sound like a brief spontaneous flush. The diagnosis depends on observation: look for gradual water loss, repeat the dye test, and inspect the flapper chain. Do not assume the handle assembly is the problem solely because the noise follows a flush-like pattern. A toilet that cycles only at certain times may also deserve monitoring for supply-pressure changes or a fill-valve malfunction.
Choose the right replacement flapper
Not every flapper is interchangeable. Toilets vary in valve size, hinge arrangement, flush volume, chain connection and model-specific hardware. An adjustable universal replacement can work for many fixtures but is not always the best fit. Before shopping, look inside the tank for a manufacturer name, model number or part information. Compare the old part with the replacement’s packaging and compatibility chart. Avoid forcing a part onto posts that are a different shape. A flapper that does not seat correctly can continue leaking, while one that stays open too long can change flush behavior. Take a clear photograph of the original assembly before removal.
A careful flapper replacement sequence
Turn the shutoff valve clockwise gently until the supply stops, flush to empty most of the tank, and sponge out water if necessary. Disconnect the chain from the lever and remove the old flapper from its mounting ears or designated connector. Clean the sealing surface with methods approved for the fixture, avoiding scratches or harsh abrasive tools. Install the compatible replacement, reconnect the chain with enough slack to allow a complete seal, and restore the water supply slowly. Test several flushes and repeat the dye test. If the shutoff valve does not close reliably or begins leaking, stop and address that valve before continuing.
Set the chain so it does not defeat the repair
The lift chain needs enough movement to raise the flapper during a flush but should not hold it up afterward. Too much slack may prevent full lifting, while too little can cause continuous leakage. On a normal installation there is a little free play when the handle is at rest. Confirm that spare chain links cannot fall beneath the flapper and that the lever arm clears the tank wall and lid. If a new flapper leaks only after certain flushes, watch it settle into the opening several times. Mechanical interference may be the culprit rather than a defective new part.
When the fill valve deserves attention
If water runs continuously after a flush and the tank level remains too high, inspect the float and fill valve. Some valves have a screw or clip for water-level adjustment, while others use a different mechanism. Follow the manufacturer rather than twisting unfamiliar fittings by trial and error. Mineral deposits or a worn internal seal may stop the valve from shutting off reliably. For homeowners comfortable with basic plumbing, replacing a compatible fill valve is sometimes a straightforward repair, but the supply nut and connection require care. If the connection is corroded, difficult to access, or already leaking, professional help can prevent a small job from becoming water damage.
Look for external water before it becomes damage
A toilet can have a running-water problem and a separate leak outside the tank. Check the supply line, the shutoff valve, the tank-to-bowl fasteners, and the floor around the base. Dry each area with a cloth and look again after flushing. A damp fitting may indicate an active leak, while condensation on the tank can mimic a supply leak in humid conditions. Water from the base, a cracked porcelain fixture or a persistent leak at the floor seal deserves prompt attention. Do not keep using a visibly leaking fixture simply because the toilet still flushes; trapped moisture can damage subflooring and surrounding finishes.
What not to put inside the tank
Avoid loose objects and harsh in-tank cleaning tablets unless the toilet manufacturer specifically permits them. Some chemical products can degrade rubber seals or other internal components. An improvised brick or bottle intended to reduce water use can obstruct moving parts or interfere with the designed flush volume. Modern water-saving toilets are engineered as systems, and changing the stored water volume without guidance may lead to poor flushing or repeated flushes. If saving water is the goal, repairing leaks and considering a WaterSense-labeled replacement when a toilet truly needs replacement are more dependable approaches than homemade tank modifications.
Test the repair rather than trusting the silence
After making a repair, let the tank refill fully and wait. Observe the water line, listen for cycling and run the dye test again. Flush several times, including after the lid is replaced, because a lever can sometimes rub the underside of a lid. Check the area around supply fittings for new drips, and verify that the bowl refills normally. A quiet toilet for thirty seconds is not proof that a slow leak is gone. Recheck later in the day and, where practical, monitor the water meter or bill for unusual consumption. It is easier to correct a slight chain adjustment now than rediscover a leak after weeks.
Know when to call a plumber
Stop DIY work if the shutoff valve will not operate, a connector is seized or cracked, the tank is damaged, water appears at the floor, or an older fixture has unusual proprietary parts you cannot positively identify. Sudden uncontrolled leakage requires shutting off the nearest working water valve or the home’s main supply. A plumber can also evaluate pressure issues or a toilet that continues running despite correctly installed internal components. Paying for a targeted diagnosis can be less expensive than replacing parts repeatedly. For rental properties, follow the lease and maintenance-reporting procedures instead of making unauthorized alterations to plumbing.
A simple preventive maintenance habit
The EPA recommends periodically testing toilets for silent leaks and notes that flappers wear with age. Make a quick inspection part of the same household routine used to check smoke alarms and exposed plumbing connections. Look for a slow cycle when no one has flushed, staining or wear around seals, and dampness near supply fittings. Record the model number when it is easy to read so compatible parts are easier to find later. A five- or ten-minute check can identify a problem while it remains small, without turning every minor noise into an emergency repair project.
Frequently asked questions
Can I replace the flapper without removing the toilet? On most standard gravity-tank models, yes; the flapper sits inside the tank and can be serviced from above. Why does the toilet run only after a flush? The seal may settle incorrectly, the chain may snag, or the fill valve may not shut off consistently. Should I replace the whole toilet? Not for an ordinary worn flapper without other significant issues. Can the dye test hurt the toilet? Follow the EPA instructions, use a small amount, and flush promptly to avoid staining. Does a toilet need to be overflowing to waste water? No; a silent tank-to-bowl leak can occur with no water visible on the floor.
The practical takeaway
Treat a running toilet as a problem to observe and isolate. A flapper that fails the dye test calls for a different fix than a fill valve sending water into the overflow. Work carefully, use compatible parts, keep the overflow function intact, and verify the repair before declaring success. The objective is a safe, reliable toilet that stops filling when it should and remains watertight between flushes. Small plumbing work can be satisfying, but recognizing when a job exceeds your tools or comfort level is part of good home maintenance, too.
Sources and further guidance
U.S. EPA WaterSense home maintenance; EPA WaterSense residential toilets; U.S. Department of Energy toilet maintenance guidance. This article is original practical guidance and is not a substitute for model-specific installation instructions.




0 Comments