
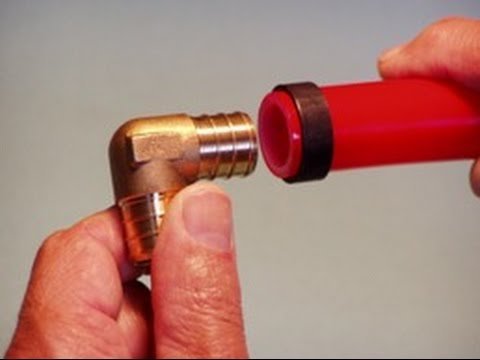
Need to take apart an existing PEX connection? A copper crimp ring is designed to clamp PEX tubing around a fitting, so removing it requires care. This companion guide explains the basics, the damage to watch for, and how to decide whether parts should be reused or replaced.
Watch: How to Cut Off PEX Crimp Rings Without Damaging Fittings

Watch the original Handyman Problem Fixer video on YouTube for a visual demonstration. The written information below is a general companion reference, not a transcript of every action in the video.
What You Need to Know Before Starting
PEX plumbing comes in different connection systems. Copper crimp rings, stainless-steel cinch clamps, expansion fittings, and push-to-connect fittings are not interchangeable. Identify the type you actually have before selecting a removal tool.
- Shut off the water supplying the line and release pressure at a faucet.
- Place a towel or container beneath the connection to catch residual water.
- Use an appropriate PEX crimp-ring removal tool or another method recommended by the fitting manufacturer.
- Have replacement PEX tubing and an approved new ring available before opening the connection.
General Approach to Removing a Copper Crimp Ring
- Expose the connection. Make enough room to work without twisting other plumbing or stressing the fitting.
- Separate the old tubing where practical. A manufacturer-approved removal tool typically works on the ring after the tube has been cut free in the prescribed way.
- Remove the ring carefully. Follow the removal tool’s instructions, keeping sharp edges and cutting force away from the fitting barb.
- Inspect the fitting. Look for scratches, flattened barbs, deformation, cracks, and corrosion. If any damage is visible, replace it.
- Reassemble using approved components. Use fresh tubing and the correct new ring, fitting, gauge, and crimping tool for that specific system.
Important: Do not assume a removed fitting can be reused just because it looks intact. Consult the fitting maker’s instructions and local plumbing requirements. If reuse is not expressly permitted or condition is uncertain, replace the fitting.
Common Mistakes That Lead to Leaks
Cutting into the barb, using a mismatched ring size, crimping too close to the tube end, or failing to check a finished crimp with the appropriate go/no-go gauge can cause leaks. PEX also needs protection from damage, incompatible chemicals, and installation conditions prohibited by its manufacturer.
When to Call a Plumber
Consider professional help if the connection is concealed in a wall or ceiling, serves a critical line, is difficult to isolate, or has already leaked. After any permitted repair, restore pressure slowly, check every joint carefully, and inspect again later for moisture.
Tools and Affiliate Links From the Original Video Description
Affiliate disclosure: As an Amazon Associate I earn from qualifying purchases. If you buy using an affiliate link, Handyman Problem Fixer may receive a commission at no extra cost to you. Product availability and prices may have changed since the video was published.
Explore more plumbing repair guides and DIY repair videos from Handyman Problem Fixer.

0 Comments